Make your own goggle lens graphics.
.
Congratulations on getting your new pair of Cyber goggles from Rivithead. Now it's time to have a little fun and customize them.
Most all of our Cyber goggles have interchangeable lenses. Which means you can mix them up or even make your own. For instance you could make them more Gothic by making bat lenses or even go an anime route by printing a solid color with light streaks on them. The possibility's are endless. In this DIY we will show you how to make your own lenses and also give you a few to print out and use.
First you need to get some transparency paper. Most office supply stores will have this. When you purchase your transparency paper check which kind of printer it supports. (This is very important) There are 3 different kinds. One for ink jet printers, one for laser printers and one that supports both. If you have an inkjet printer we recommend the dual paper as it is more transparent. For a laser printers go with the laser printer paper. If getting transparency paper is out of your budget plain old printer will work, just don't get it wet.
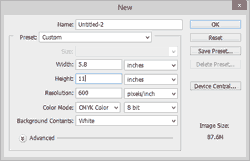 Once you have your transparency paper it's time to get to work. If you are going to design your own graphics for your goggles open up your favorite graphics editor. You will want to make a template for your new goggles. When you create a new image we suggest setting the pixels per inch (PPI) to what your printer can print. Most printers print in CYMK color so to get the best idea of what your graphics will look like when printed select the CYMK color mode.
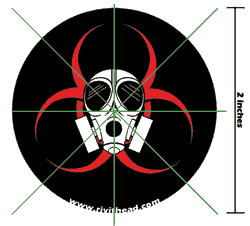 Now begin by drawing a 2 inch x 2 inch circle. We found it extremely helpful to draw in reference marks on a separate layer. To get your center mark draw a box around the circle you just created. Then intersect the corners of that box making an X. The center of the X will be the center of your lens. Fill in the circle with your graphics making sure to center it on the middle of the X you created.
Now it's time to print out your new creation. If you are using transparency paper there is a little trick. The dual sided paper will have a smooth side and a rough side. The smooth side is for laser printers and the rough side is for inkjets. It's important you put the paper in the printer properly. If you print on the smooth side on an inkjet the ink will not adhere to the paper and you will have a big inky mess. If you use the rough side on a laser printer the heat will destroy the paper and possibly crud up your printer. Best bet is to follow the instructions that came with the paper.
Now that you have your new lenses printed out grab a pair of scissors and cut them out. Now cut out a circle the same size out of colored paper. Un-screw the lens holder on your goggles and put the printed graphics then your colored paper and then the old lenses back in the cap. Screw it back on your googles and your done.
If you want to try out some of our designs please feel free to print and use our designs for your own personal use. If you have created some lenses you would would like to share email them to us and we may post them up on our site!
 Rivithead Logo lens pdf
 Biohazard Rat Skull lens pdf
 Eye lens pdf
 Chaos Star lens pdf
 Pentagram lens pdf